
Do Photographers Edit Their Photos?
There has long been a divide between the general population and their opinions on photo editing. Some think it might “take away” from the raw art of photography, while others see it as a way to enhance images. After all, art and photography are all about artistic perception. So rather than speculating, let’s talk about what’s seen as the industry standard amongst professional photographers editing photos.
Any professional photographer will edit their photos. Although each will have a different style of editing, it’s common practice in the photography industry. Photo editing allows photographers to enhance the image and stylize it in ways that would not be possible in-camera. Without it, it’s much harder to make your photos stand out from the crowd.
Now let’s dive into the exact reasons why photo editing is one of the fastest ways to level up your photography.
Why Do Photographers Edit Photos?
At first, it’s easy to brush off photo editing as a way to hide a lack of talent. I mean, if you’re a great photographer, you shouldn’t need to edit your photos. Right?
I’ve heard this reasoning over and over again online and from different clients.
Although this mindset is understandable, it’s important to note that photo editing doesn’t necessarily mean you’re changing the image. You’re only enhancing it.
The vast majority of photographers don’t add anything new to their images during photo editing. In fact, the only real differences made are in the color and exposure. Each photographer will have their own idea of what makes the “perfect edit” and begin to create a unique style over time. With each photo, they tend to favor certain color tones and contrast levels that fit their tastes. These editing styles are one of the most notable differences between all professional photographers.
Before photo editing, it was commonplace you had to get more creative or go further to find a photo that nobody else has. To capture something totally unique to you. Admittedly, this is still one of the best ways to stand out as a photographer, but with social media, it’s not unusual to have someone totally copy your ideas.
Luckily, most people tend to edit their photos completely differently. So even with the exact same shot, the final edit of the image looks completely unique. Over time, these editing styles become synonymous with a photographer’s brand and is the reason people hire them.
When I’ve asked my own clients why they hired me in the past, one of the main reasons I’m told is because they “liked my style.” In layman’s terms, style often equates to photo editing.
In the modern-day of photography, clients hire you because of the look of your images. Photo editing is the key to making that look fully unique to you. That’s why any photographer (with a digital camera) who takes themselves seriously will edit their photos to some degree.
What Does An “Edited Photo” Mean Exactly?
I’m willing to bet you’ve heard the term “edited photo” in a number of contexts. One person might proudly talk about the photo they “edited,” while another might be in a rage because a photographer “edited the photo.” The words “edited photos” get thrown around in many different contexts because not all editing is the same. It’s important to note the difference between photo editing and photo manipulation.
At the most basic level, an edited photo is an image that’s been altered from its original state. Even the smallest adjustment in crop, exposure, or contrast would make a photo “edited.” However, some photographers go much further than this and replace certain parts of their photos altogether. Once you start making substantial changes to a photo, you begin to drift into the photo manipulation territory.
– Photo Manipulation

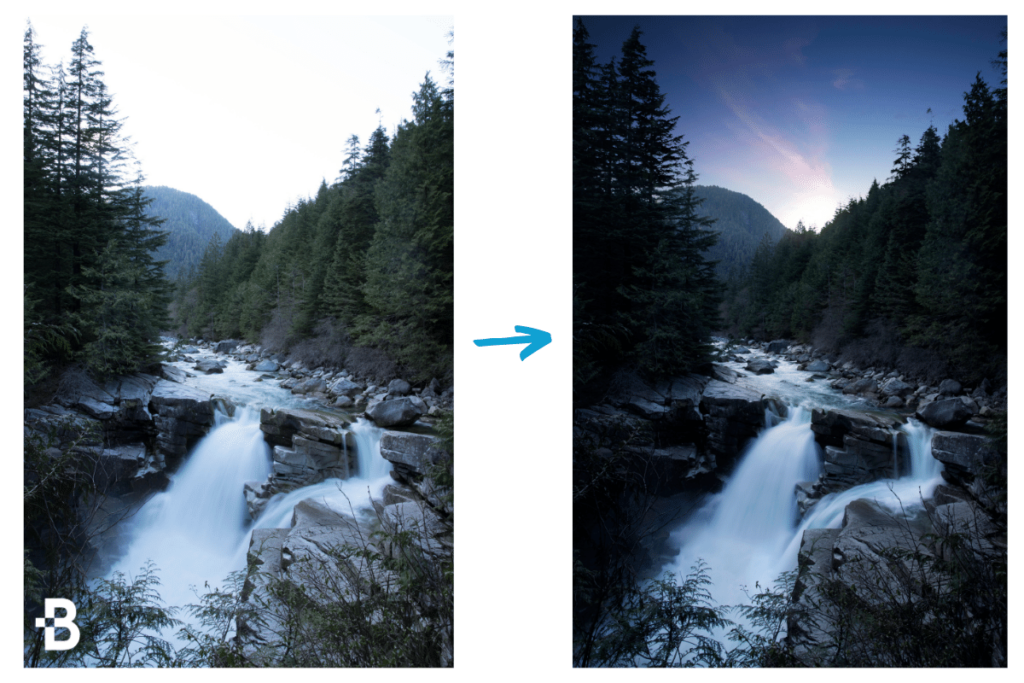
Photo manipulation is when the photographer adds elements to an image that weren’t naturally there. With programs like Photoshop or Luminar, it’s exceptionally easy to create an entirely new image by adding a new sky, for example. This is surprisingly common among many photographers and isn’t a problem as long as they don’t claim it to be totally real.
Photo manipulation is more used amongst creative photographers whose images aren’t being used for documentary or news style imagery. It’s not uncommon for portrait or landscape photographers to add unique elements to their photos to add a little extra “zest” to the composition.
In the world of photo manipulation, you’ll find yourself in one of two camps. Some people don’t care whether a photo is manipulated, while others are bothered by the idea of “lying” for a better image.
At the end of the day, photography and photo editing is an art form. Some painters wouldn’t paint a scene exactly as they saw it; they’d add different elements to enhance the end result. The same thing goes for photo manipulation. As long as the photographer is honest about altering the photo, photo manipulation is a unique art form that’s a lot of fun to experiment with. It just takes a lot more experience and mastery of photo editing programs to make it accessible.
However, if you’re a beginner editor who wants to get into manipulations, I’d highly recommend looking into Skylum Luminar (click here for my in-depth review).
– Photo Editing
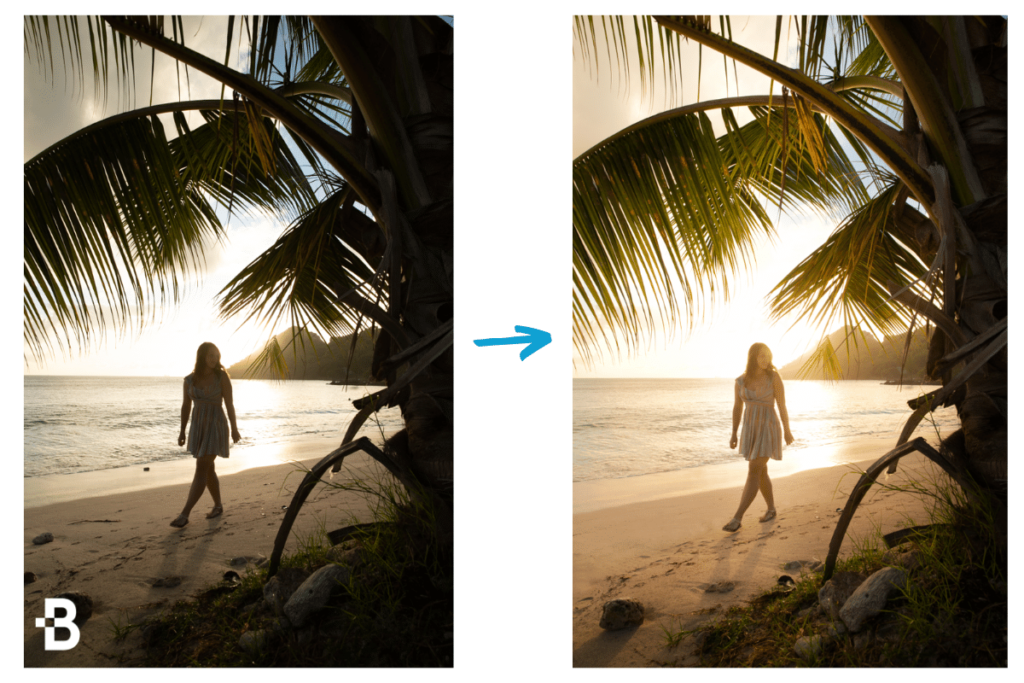
At the more common level, photo editing is just the slight changes in color, contrast, and exposure in a photo. These adjustments don’t actually alter any physical part of your image, but rather how certain areas appear.
With the help of exposure, you can draw more attention to your subject while darkening everything around them.
With the help of color adjustments, you can correct the white balance or change the mood of your photo with a few sliders.
Using contrast, you can add a soft or gritty look to your photo to better fit a particular scene.
Unlike photo manipulation, photo editing only enhances your photo, not changes it. The vast majority of photographers use photo editing to correct and improve upon what they created in-camera. It’s surprising how much better a few color adjustments can make your photos look.
Photo editing can be done in a variety of different ways. Whether you use an app on your phone, a built-in photo editor on your computer, or a professional program, you can still improve your photo. Little things like straightening the horizon, correcting the white balance, or changing color hues are simple ways to make your photos look more professional and stylized.
Is Photo Editing A Part Of Photography?
Even though photo editing is necessary for professional photographers, it’s not needed for all hobbyists and casual shooters. If you feel like you’re missing out by not editing your photos, then try it out and see if the difference is worth it. Depending on your intentions for your photography, that will dictate whether or not it’s totally necessary.
As a whole, photo editing is not a necessary part of photography. Although closely related, you can still capture great photos without ever touching an editing software. For most hobbyists, the investment for a photo editing program isn’t always worthwhile. There’s still lots of satisfaction and fun to get out of photography without editing your photos.
On the flip side, professional photographers absolutely need to edit photos if you want a chance to compete. It has become widely accepted in the photography industry that photo editing is just a part of the process. As I like to call it, photo editing is just the second half of taking a photo.
Clients expect photos to be edited, cleaned up, and as flawless as can be. Without photo editing, this would be next to impossible to accomplish. Likewise, creating the unique color palettes and tones in your photos would be equally challenging to do fully in-camera. That’s why in a professional sense, photo editing and photography are a package deal.
So the answer to whether or not photo editing is a part of photography depends on your intentions. As a hobbyist, it’s not necessary to edit your photos, but it can be a lot of fun. If you want to spend the money on an editing program, it can be a great way to improve your photos. For professionals, photo editing is a pre-requisite to making it in the big leagues. Without it, it’d be nearly impossible to compete.
How Long Does It Take For A Photographer To Edit Photos?
There are a lot of different things that can be done while photo editing. Each photographer has their own process, and it depends on how much editing is required. On average, it takes most photographers 5-10 minutes to edit a photo, but this number can vary drastically. Let’s get into some of the variables at play.
– Color And Exposure Adjustments
At the most basic level of photo editing, all that’s required are basic adjustments color and exposure. In most photo professional editing programs, this entire process is intuitive and fast. When you only need to edit these basic values, it only takes photographers around 5-10 minutes per photo. This is assuming each photo is done from scratch.
One of the biggest factors that play into the time taken for editing is a workflow. With a professional workflow, you can make your way through dozens of adjustments in minutes. To help you speed up the editing process, check out this post sharing my tried and true Lightroom editing workflow.
– Retouching
Photo retouching is any time you need to remove certain parts of a photo. This could be something like blemishes on a model’s skin or a trash can in the back of the image. Whatever it is, retouching is meant to get rid of any distractions and make the image look as flawless as possible. Since the entire process must be done manually, it takes significantly longer than other forms of editing.
For many retouchers, it’s not uncommon to spend 20-30 minutes on one photo. I’ve even spent multiple hours on one photo just to make sure it was perfect. Luckily, you’ll rarely find yourself retouching an entire wedding or event with thousands of photos. This type of editing is usually reserved for key images or close up portraits where you want to make them look their best.
– Photo Manipulation
As you learned in the previous section, photo manipulation is when you add new elements to a photo. This could be something like replacing the sky or can be the process of merging multiple photos. Since this process is so involved and requires you to cut out parts of the photo, photographers can spend up to 1 hour or more per image.
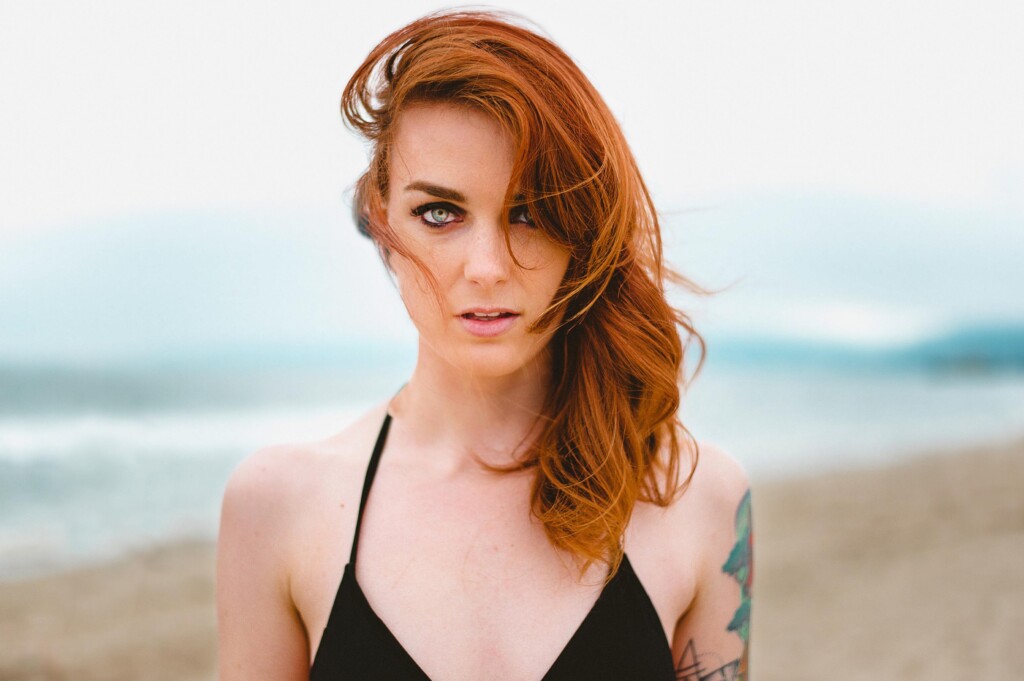
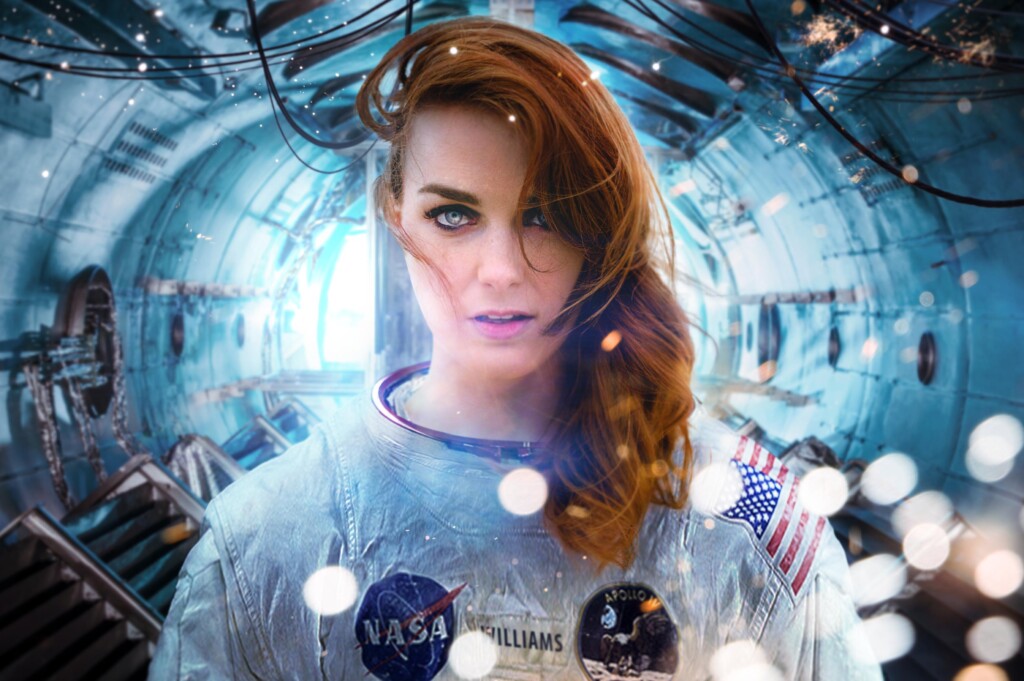
Depending on how involved the manipulation is, one photo can take hours or days. In the photo below, it took me a total of 10-12 hours to create all the elements. Since the subject started in a bathing suit, it was a tedious process. It ate up a lot of time to create the spacesuit, sparks, bokeh, and lighting effects from scratch.
– Batch Editing
Just like making a batch of cookies, batch editing edits a series of photos all at once. Especially when working with images taken around the same time, they’ll likely require the same adjustments. Rather than making the same adjustments repeatedly, you can speed up the process by copying and pasting.
While batch editing, you can edit a photo in less than a minute once you’ve made your initial adjustments to duplicate. For photographers who need to work through thousands of photos at a time, this is the method of choice.
To further speed up the process, you can also use presets while batch editing. A preset is a premade adjustment that will automatically apply particular effects in one click. They’re a much faster way to work in bulk and complete complicated edits in less time. You can find a variety of photo editing presets and assets here.
What Types Of Things Are Done During The Photo Editing Process?
If you’re new to the world of photo editing, the whole process might seem a bit mysterious. What exactly are photographers doing to make their photos look so different? Well, let’s talk about some of the most common editing adjustments used by all professional photographers.
1. Crop And Straightening
Sometimes when you take a photo, your camera was slightly slanted or wasn’t framed up perfectly. That’s why one of the first editing adjustments done is cropping and straightening.
Cropping the photo is useful in situations in which you want to align a certain part of your photo better. For example, if your subject was slightly off-center, you could crop the photo to center them perfectly.
Likewise, if there was some type of distraction at the edge of your frame, you can adjust the crop to get rid of it. This is a much faster way to get rid of something compared to spot removal. However, it should only be used if it won’t require a major crop to your photo. Cropping should only be used if you have a specific reason to. It’s not a requirement for every photo you edit.
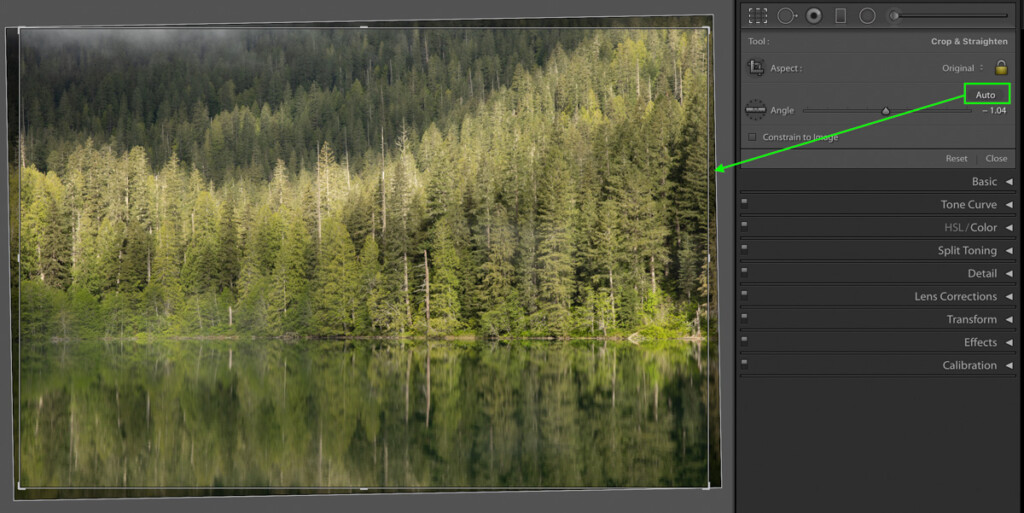
Unlike cropping, straightening adjusts the angle of your photo. Its main purpose is to correct horizon lines and ensure your photo doesn’t feel crooked. In professional editing software, some tools will automatically straighten your photos in one click. Before you begin any other editing adjustments, make sure your photo looks straight!
To learn how to crop and straighten photos easily, check out this post.
2. White Balance Adjustment
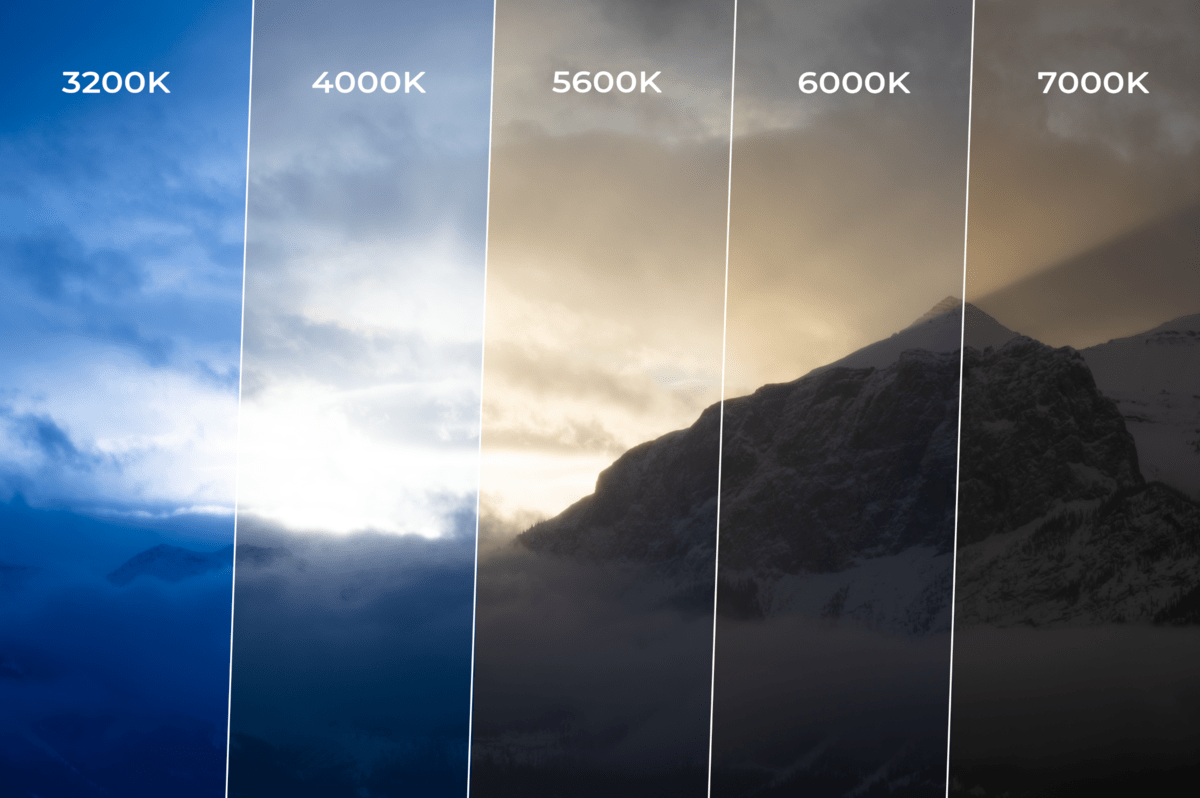
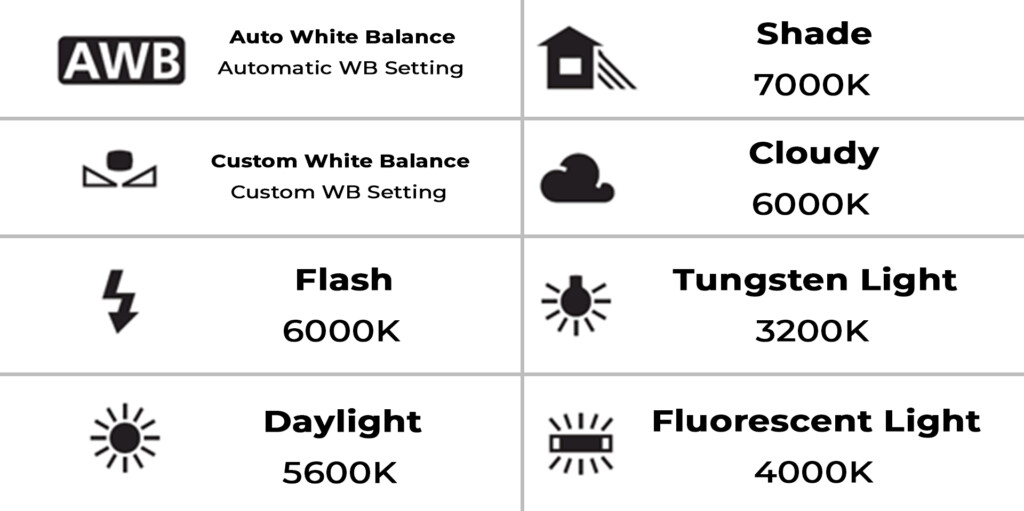
White balance is how your camera perceives the color white. With every light source comes a slightly different color temperature that affects the colors in your photo. By using a correct white balance, you can ensure your photo looks as natural as possible.
Try to think of a light in your house. I’m willing to bet it has some kind of yellow-orange hue to it. Now take a look outside and see what color of light you see. At mid-day, daylight appears as a white color. These shifts in light color completely change the look of your photos. Although you can change the white balance for your photos in-camera, it’s still possible that it doesn’t look quite right. That’s where a white balance adjustment comes in.
With photo editing, you can adjust your photo’s white balance to correct for different color hues. For example, you might favor a warmer white balance while taking photos outside to prevent your pictures from looking “cold.” Likewise, you might use a cooler white balance indoors, so your skin doesn’t look too yellow.
White balance is a fast adjustment that can be made with any photo editing software or app. Before you begin editing colors in your photo, make sure your white balance looks correct. That way, everything will look as natural as possible!
To learn more about white balance and how it works, see my white balance for beginners’ guide.
3. Contrast Or Tone Curve Adjustment

In simple terms, contrast is the intensity of your highlights and shadows. If an image has brighter highlights and dark shadows, it would be considered a “contrasty” photo. There are several different ways to adjust the contrast in your photo in any editing software.
One of the easiest ways is with the contrast slider. This slider does the legwork for you and changes the highlight and shadow values at a constant rate. If you aren’t too particular about the levels in your image, this slider makes adding and removing contrast easy. You’ll be able to find this slider in nearly any editing program on both mobile and desktop.
The second way to adjust contrast is with the tone curve. Rather than letting a slider do the work, you can manually choose where and how your contrast is applied. The tone curve is broken up into 4 rows covering your shadows, darks, whites, and highlights (left to right). By lifting the tone curve, you can brighten any exposure across these ranges. To darken an exposure range, just drag down the tone curve.
I talk extensively about how this tool works in my tone curve adjustment guide.
Contrast adjustments are used to add more life to a photo and create a stylized look. There are many different ways contrast can be used creatively and is a powerful tool in spot adjustments. In some higher-end mobile photo editing apps, you’ll have access to the tone curve for easy adjustments. For professional editing programs, this tool is a staple item.
4. HSL (Hue, Saturation, Luminance) Adjustment
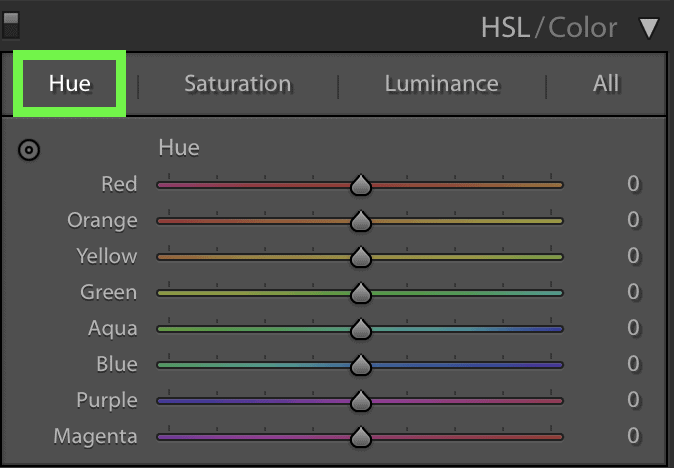
One of the easiest ways to adjust color is with HSL adjustments. By using Hue, Saturation, and Luminance, you can effectively target every value in a color range. With this adjustment, you can go between enhancing colors to changing them completely.
For example, you could change your photo’s hues to take on a more stylized version of itself. If you took the blues in your photo and adjusted the hue, you could alter them to look more cyan or purple. Whichever way you go, it totally changes the feel of your photo. The same thing goes for every other color in the HSL adjustments.
With saturation adjustments, you can alter how vibrant and rich particular colors are. If you were editing a photo of fall leaves, you might boost the saturation of the reds and yellows to enhance the trees.
Lastly, luminance affects the brightness of certain colors. As you increase the luminance, you can gradually wash out and fade the look of a color. This adjustment is perfect for fine-tuning a highly stylized color tone in your images.
The typical color options for an HSL adjustment are red, yellow, green, blue, and magenta, but can alter between programs. Together, each of these color channels allows you to target any color in your images perfectly. There’s no easier way to adjust and change colors than with an HSL adjustment. This tool is a part of any professional photo editing program and certain mobile editing apps.
5. Sharpening And Noise Reduction
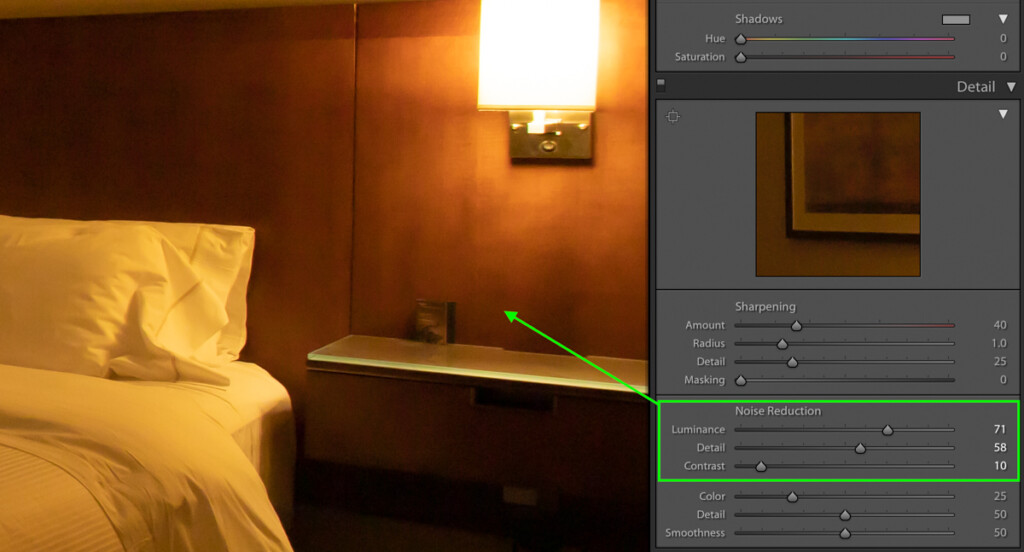
Lastly, sharpening and noise reduction are like the cherry on top of an edit. With these adjustments, you can improve how clear a photo looks in seconds.
The sharpening adjustment works by creating more edge contrast in your photo. The result makes your photo’s details stand out more than before, especially so with your subject. In any photo editing program, sharpness adjustments can be made with the sharpening slider. Simply by moving it up or down, you can vary how much the details in your photo stand out.
Secondly comes noise reduction. Depending on the conditions you were shooting in, you might have shot with a high ISO. In this case, you’ll have more noise in your photo that can be a bit distracting. With noise reduction, you can smooth out the noise in seconds. You can learn how to do that here.
These photo editing adjustments are used to improve the clearness of pictures. No matter what type of photography it’s for, these are some of the most often used photo editing adjustments by professionals.
If you’re feeling inspired to get going with photo editing, get an in-depth look at each of these tools in action in this post (how to edit photos in Lightroom).
What Software Do Professional Photographers Use To Edit Photos?
Now that you understand how and why professional photographers edit photos let’s talk about programs. Below are the top photo editing programs used by photographers worldwide.
Adobe Lightroom
Lightroom is one of the most common editing programs used by photographers. As part of the Adobe Creative Cloud, you can’t buy this program outright. Instead, it works on a subscription basis. Lightroom is one of the most intuitive editing programs I have ever used and is the primary program I work in.
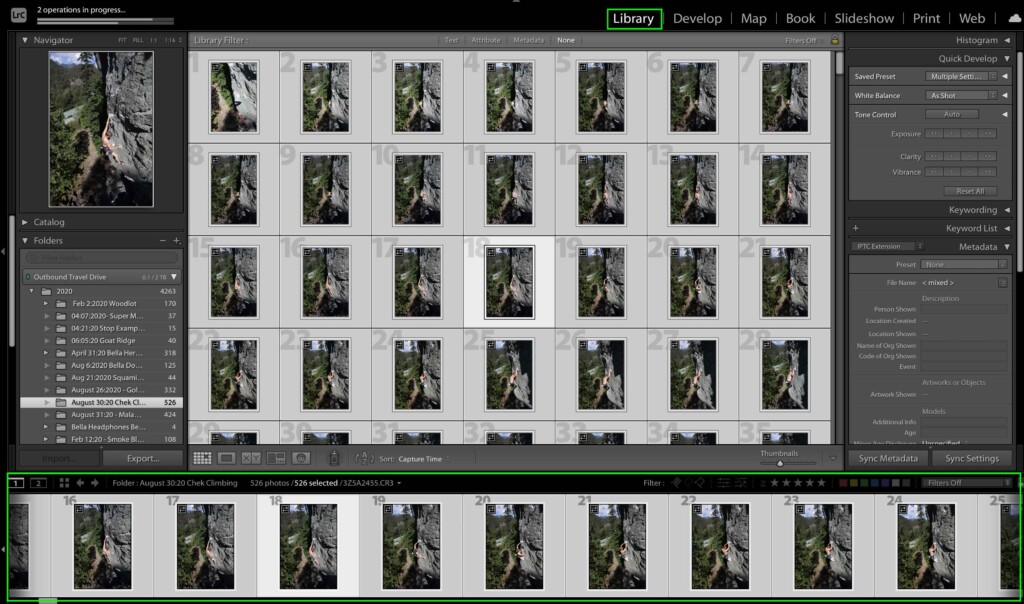
Inside of Lightroom, you have every option you’d ever need for photo editing. You can easily import and organize photos in the Library module, then cull through and rate your best photos in seconds. Especially when you’re working in bulk, Lightroom is a must-have tool.
In terms of editing capabilities, Lightroom covers all the essentials. With extensive color and exposure adjustments, this program has really set the standard. Looking back, a lot of new editing programs model their interface very close to that of Lightroom.
– How Beginner Friendly Is Lightroom?
Lightroom is one of the most beginner-friendly programs I have ever used. I’ve shown people a quick one-hour overview of the program, and they were creating beautiful edits the same day. Since the layout is so clear and well organized, it doesn’t take much brainpower to figure out where to go next. Once you know the name for the different adjustments, it’s clear and easy to see which ones to use for a particular result. If you don’t mind the subscription-based price model, this is a great photo editing program to consider!
– What Is Lightroom Best For?
Lightroom is best at organizing and editing large numbers of photos. It only allows you to do color, exposure, and basic spot removal adjustments. For photo manipulation and composite work, Lightroom doesn’t have the tools necessary. Lightroom is one of the best general-purpose photo editing programs.
Skylum Luminar
Luminar is an AI intelligence based editing software that is a dream to work with; especially if you’re a beginner photographer. What separates this program from the crowd is that it automates a lot of steps that are long and tedious to do in other programs. For example, Luminar replaces skin retouching’s complex steps into a group of easy-to-use sliders. You can soften skin, brighten eyes, and even adjust proportions in seconds by adjusting a slider.
Unlike the Adobe Creative Cloud, Skylum Luminar is a one-time fee. Once you purchase the program, it’s yours to use for life. No extra costs required. Especially if you aren’t making money from your photography, it’s more cost-effective to take this route. Since it has many of the same features as Lightroom, you likely won’t notice a huge difference in capabilities.
– How Beginner Friendly Is Luminar?
With so many automated and AI intelligent features, Luminar does a lot of complicated tasks for you. By making these difficult photo editing effects accessible to anyone at any level, Luminar is extremely beginner-friendly. At first glance, it can be tricky to navigate and fully understand the tool layout. However, after a day or two in the program, you’ll feel extremely confident making professional-looking edits with this program.
– What Is Luminar Best For?
The beauty of Luminar is that it merges basic editing adjustments with full-fledged manipulation options. It’s the perfect program to make complex edits complete with sky replacements and skin retouching in less time. However, I find the file organization of Luminar to be a little harder to work with than in Lightroom. That’s why I only edit large numbers of photos in Lightroom since it’s faster with my workflow. If you only need to edit a handful of images at a time, Luminar will work great.
Learn More: Skylum Luminar 4 Review – Is It Worth It?
Adobe Photoshop
Photoshop is one of my favorite photo editing programs simply because there’s nothing it can’t accomplish. With so much versatility, it’s an absolute powerhouse program once you figure out how to use it, that is. Although it’s not meant for working with photos in bulk, it’s the best program for manipulation and complex retouching. It also has a wide array of unique color adjustments that I find work better than tools in other programs.
Photoshop is another program that’s part of the Adobe Creative Cloud platform and can be bundled together with Lightroom. As part of the photography plan, you can get these two programs for a reasonable monthly fee. If you are looking for the best you can get in editing capabilities, the Lightroom and Photoshop combo can’t be beaten in my experience.
– How Beginner Friendly Is Photoshop?
Although powerful, Photoshop is one of the least beginner-friendly editing programs out there. It takes a lot of time to fully understand how layers, masks, and individual tools operate in the program. With that said, if you have the patience, having good Photoshop skills is incredibly valuable for photographers. There is almost nothing that can’t be fixed in a photo when using the tools in this program.
– What Is Photoshop Best For?
Photoshop is best used for specific adjustments that can’t be done in other programs. Things like removing backgrounds, cloning out objects, or any type of graphic work is best done here. The program has a wide array of highly useful photo editing tools while offering additional features for composite work (merging multiple photos) and graphic design.
Capture One
Capture One is another all-purpose photo editing program that’s used by professionals and hobbyists alike. It’s another very easy-to-use program that feels natural to navigate. It comes complete with all the essential exposure and color adjustments while boasting improved color control compared to other software.
Capture One has a lot of very powerful tools that allow you to do just about any adjustment in the program. Even more complicated changes like blemish removal or lighting effects are easily created here. Another advantage of the program is that you have the option to buy it outright, unlike the Adobe suite. Although a lot more expensive compared to Luminar, this program has everything a professional photographer would need.
– How Beginner Friendly Is Capture One?
Like most editing programs, Capture One will take some time to get oriented with. However, once you understand the general layout and how to sort through files, it’s extremely easy to use. With a similar layout to Lightroom, it has a sleek and straight forward design perfect for any beginner photo editor.
– What Is Capture One Best For?
Capture One is perfect for general-purpose editing. It does an exceptional job of working with thousands of photos at once or just editing individually. The program doesn’t have the ability to make extreme photo manipulations but works perfectly to quickly edit professional, stylized images.
Will Photographers Ever Give Unedited Pictures?
With all this talk of how and why photographers edit their photos, what are the chances that one will give you an unedited photo? The answer depends on the photographer.
As you’ve now learned, photo editing is a part of the creative process for photographers. This is when you can add your own creative flair to the image and be proud of the final result. The look you create while editing is why your clients will notice and hire you to begin with.
For most photographers, they’ll prefer only to give you the edited version of their images. The reason is that their name is attached to the photo. If a picture looked sub-par before editing, it’s a reflection on them if you decide to post it everywhere.
The same goes for why photographers don’t like you editing their pictures. After they put in the time and energy to edit an image, it’s something they’re proud of. By putting your own edit on top of theirs, you’re basically saying that it didn’t meet your expectations.
Understandably, photography and editing are a subjective art. What you love, I could hate. That’s why you should always work with a photographer who’s style you already love. That way, you avoid the uncomfortable drama of asking for unedited pictures down the line.
Photo editing is becoming increasingly popular and a pre-requisite in the photography industry. Most of the photos you see online today are edited to some degree, whether it’s just the color or a full-on sky replacement. Ultimately photo editing is used by photographers to enhance images and add a unique tonal appearance to photos.
Happy Editing!
– Brendan 🙂


